These are the need to know tips and tricks for Salesforce. We will be bringing you more tips in the Spring.. Check out our latest blog posts to keep upto date with the latest Hyphen8 news hyphen8.com/blog
Become A Salesforce Trailblazer
Have you discovered Trailhead yet? Trailhead is Salesforce’s online learning platform. You can complete Modules to earn badges and points which can be displayed on LinkedIn etc. The more points and badges you earn, your profile changes. Trailhead is a fantastic way to “learn” Salesforce. New Trailhead badges are added frequently so its perfect for keeping up to date with the latest Salesforce advancements. Trailmixes are a mix of modules compiled like a spotify playlist for you to work through. Reach out to us if you want to attempt one of our trails. Start your Salesforce Learning Adventure Here. Trailhead is the ultimate online, free and fun way to learn Salesforce.
Get Rid of Inactive Report and Dashboards
Are you fed up unwanted clutter in your organisations report folders? People always create a report, save it, run it and then forget all about it. Not only do unwanted reports use up valuable space, they also mean it can take a while to find the report you need.
1. Navigate to Report Types:
2. Create a report type with Reports as the primary Object and Dashboard Components as the child Object. Name it “Reports WITH OR WITHOUT Dashboards.”
3. Create a new report using this new report type. Include the “Last Run” field. Run the report.
4. Sort on the Dashboard name (Title) column to separate the reports not attached to dashboards. Finally, observe the last run date of the reports. If the dashboard’s reports do not show a current last run date, then you can assume this dashboard has not been “refreshed.” Refresh triggers the report’s “last run.”
Turn on field history tracking for those important fields!
Field history tracking is a fantastic way to capture edits to your data.
Field history tracking, allows you to track changes on up to 20 standard or custom fields on an object which can be viewed on a record’s History related list or through History reports. For each field, tracking logs the date and time of change, the user making the change, and old and new values.
Field history tracking is easy to turn on.
To enable field history tracking
From Setup, click Object Manager and select The Object you need.
Select Fields & Relationships, and click Set History Tracking.
Select Enable “Object” History, then select the fields to track:
Click Save.
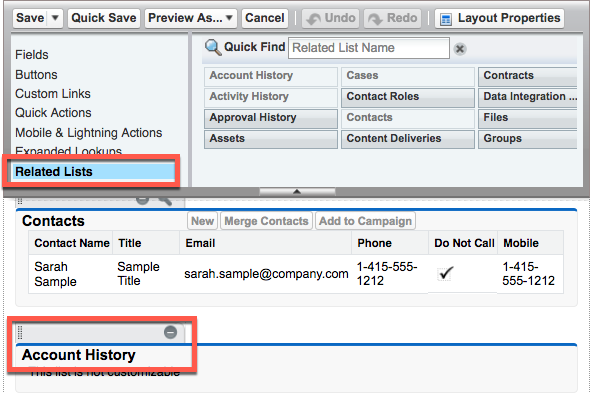
Now you just need to add the history pane to the page layout.
Find the object in the object manager.
Click Page Layouts.
Click on the appropriate Layout.
In the palette, click Related Lists.
From the palette, drag the History related list onto the page layout and drop where you would like the list to display.
The additional value of having Hyphen8 and what you brought to the project with regard to sector knowledge and recent experience you had delivering Salesforce systems to similar charities was one of the deciding factors of choosing Salesforce.